|

Home
Plans
Parts List
Building It
Tools
Prototype?
Images
Links
| |
|

|
|

|
| In this
section you will engage in some basic metal forming (bending).
Cut all the pieces of brass to length in the miter box using
your razor saw. After you have finished cutting the various
pieces to length, spend a little time with a needle file
smoothing the rough edges left by the razor
saw. Next, lay
out the hole centers and bend lines on |
the 4-1/8" long
piece of 1/4" x .032" brass that will become the idler
shaft support "U". Use a center
punch to create a starting point for the drill at the
intersection of your layout lines. Drill all four holes in the
piece you just marked out with a 1/8" diameter
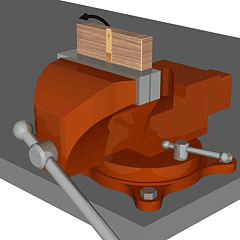
bit. Clamp
the piece in your vise (Fig. 1) with the fold line slightly above the jaw
of the vise. Use a scrap of hardwood to bend the piece at the
fold line. By holding the block of wood as near to the fold line
as possible, you will be able to make a neat, sharp bend. Turn
the piece over in the vise and repeat the procedure for the
other bend.
|
Figure
1
|
|
|
|
|
|
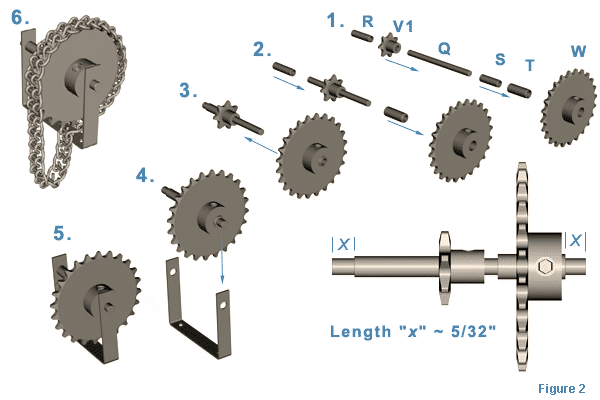
| Slide the
spacers "T" and "S" over the
idler shaft "Q" and then slide the 24-tooth sprocket
"W" over these telescoping spacers (Fig. 2). Slide the
7-tooth sprocket "V1" onto the idler shaft from
the opposite end, followed by the spacer "R".
(The set screws on my 7-tooth sprockets were too long and fouled
the chain. The set screws can be shortened by grinding a little
off of both ends. The easiest way I found to do this was to hold
the sprocket in my bench vise with the set screw protruding from
its hole. I then ground off a little at a time, using an
abrasive cutoff wheel in my Dremel tool.)
After
aligning the sprockets and spacers as in the drawing, use an allen
wrench to tighten
the set screws on the sprockets to secure the assembly. The set
screw in the larger sprocket will hold itself and the two
telescoping spacers without any trouble. There is no need to
drill holes in the spacers for the set screw. Test fit this
assembly in the u-shaped support you made earlier. The shaft
should spin freely in the holes you drilled. If it does not,
open out the offending hole(s) with a round jeweler's
file. Use
great care here, only the smallest amount of material should be
removed between trial fits. Once you are satisfied with the
smoothness of operation, remove the idler assembly from the
bracket. Cut
another section of ladder chain to a length of 33 links. This
will be the primary drive chain "X", connecting
the motor to the idler assembly. As before, use needle nose
pliers to open the links at one end of the chain. Join the ends
of the chain, and slip it over the large sprocket on the idler
shaft. |
|
|
|
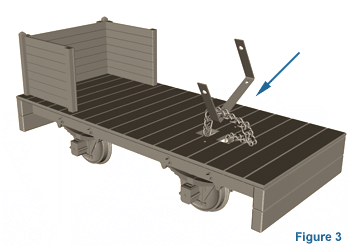
| The
u-shaped bracket can now be passed through the secondary drive
chain where it protrudes from the deck (Fig. 3) and
fastened down using two 3/8" long, #2
brass wood screws. A look at the drawings and photo will make
this operation clear. When driving screws into wood, it is good
practice to drill a pilot hole for each screw. This helps
prevent stripped holes and strengthens the joint. For the #2
screws, a #60 drill bit is appropriate. A drop of white
glue placed in each hole just prior to driving in the screws
will strengthen the wood fibers around the thread, and yet the
screws can still be easily removed. |
|
|
|
|
|
|
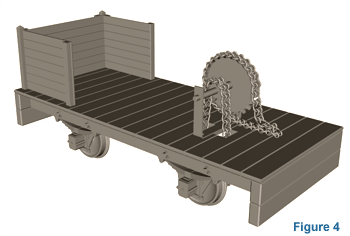
You may
now insert the idler assembly into the bracket (Fig. 4). Make sure that
the secondary chain is on the drive wheel sprocket when you do
this. If you have been careful with the work up to this point,
the chain should be a good fit. If it is too loose, you can put
one or more washers between the bracket and frame where the
mounting screws are located. This is also the preferred method
for taking up wear later on in the service life of the
locomotive. |
|
|
|
|
|
Copyright
© 1994-2004 Michael Martin. All rights reserved.
This
page last updated: 12/10/03
|
|
|