|

Home
Plans
Parts List
Building It
Tools
Prototype?
Images
Links
| |
|

|
|

|
|
| The
Midwest Model VI Steam Engine Kit is the heart
of this locomotive.
The instructions provided with the kit
are thorough and easy to follow.
The most important part of the assembly
is the port face of the cylinder.
Make sure you do not scratch it or
“round over” the face by sanding it.
Instead, you can burnish the face |
|

Figure
1
|
on
a piece of brown paper (from a grocery bag) on a
hard, flat surface.
Assemble the boiler and engine as
directed by the Midwest instruction manual.
The screw that holds the port block to
the cylinder should be given a drop of Loctite.
It will be adjusted during the first run
for optimum performance.
In some cases it may be necessary to
remove ½ to 1-1/2 coils from the spring.
Too much spring pressure will cause
excessive drag and may even prevent the engine
from running. |
 |
|
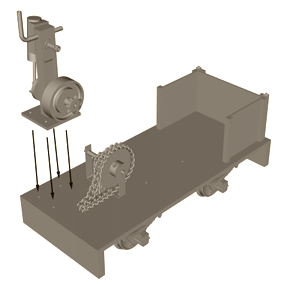
The
remaining 7-tooth sprocket “V2”
mounts on the output shaft of the motor (Fig.
1).
As with the other 7-tooth sprocket, the
set screw may need to be shortened.
The motor mounts to the deck with four
3/8” long, #2 brass wood screws (Fig. 2).
The mounting holes in the motor base can
be elongated with a round needle file to provide
some fore-aft adjustment.
The holes should be marked with the motor
in place and the slack pulled out of the chain (Fig.
3).
However, the chain should not be taught.
Don’t forget to drill 1/16"
diameter pilot holes before driving in the
screws.
|
Figure
2
|
|
|
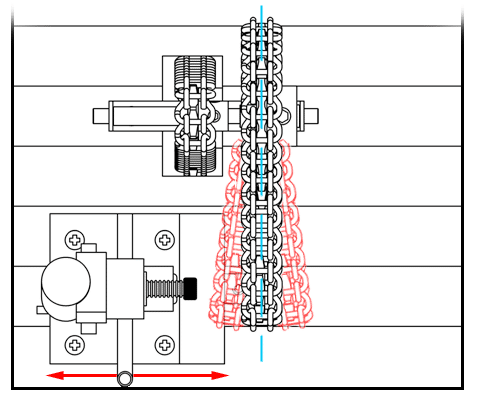
Use
care when aligning the motor on the deck.
The sprockets should be
aligned with each other and the chain should not
"bend" to either side.
Figure
3
|
|
|
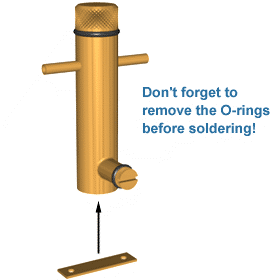
| As
supplied, the
lubricator does not have any provision for
mounting.
You can use a 1” long piece of the ¼”
x .032” brass strip and soft solder it to the
bottom of the lubricator (Fig. 4). It’s easier to drill
the 1/8” diameter mounting holes in the
bracket before attaching it to the lubricator.
Don’t forget to remove the O-rings from
the fill and drain plugs prior to soldering.
Drill the mounting holes for the
lubricator in the deck using a 3/32” drill
bit.
Secure it with two, ¼” long, 2-56
machine screws and nuts (Fig. 5). |
Figure
4
|
|
|
|

Figure
5
|
The
lubricator is an important accessory.
It helps to keep the motor from
wearing out prematurely and adds
considerably to the power of the
locomotive. Without a lubricator,
much of the steam is wasted as it leaks
past the piston and escapes to the
atmosphere. This leakage is known
as "blow-by". The
lubricator mixes oil with the steam thereby
providing a seal between the piston and
cylinder wall. |
|
|
|
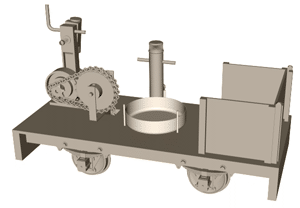
| Locate
the fuel pan from the Midwest kit on the deck.
Note that the pan is centered left to right, but
is placed slightly towards the front of the deck
(towards the bunker end). This is to make sure the boiler will
clear the large sprocket of the geartrain.
Mark the locations
of the three 1/16” diameter positioning pins
(again, from the Midwest kit) and drill the
1/16" diameter holes through the deck.and
into the crossbraces. Roughen the ends of
the pins with coarse sandpaper and use epoxy to
secure them in the holes.
The pan is not glued so that it may be removed
for fueling and cleaning. |
|
|
|
|
|
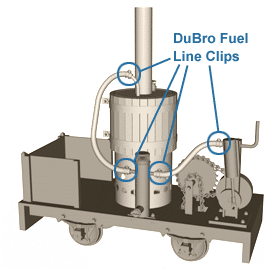
The
boiler wrapper needs to have additional holes
punched in it to allow enough air into the
fire. Using an inexpensive paper hole
punch from the stationary store, double the
number of holes in the firebox area of the
boiler wrapper. Assemble the boiler per
the plans provided with the Midwest kit. Next, place
the assembled boiler over the fuel pan and its
locating pins. Cut
the silicone tubing steam lines “AD” so that
they make a nice gentle curve from the boiler to
the lubricator , and then on to the motor.
You must slide the hose clamps “AC” over the
steam lines before attaching them to their final
locations. This concludes the installation
of the powerplant. |
|
|
|
|
|
Copyright
© 1994-2004 Michael Martin. All rights reserved.
This
page last updated: 12/10/03
|
|
|